Local Version Control using Git in a Nutshell
15 minutesModule: Local Version Control using Git in a Nutshell
Prefer reading? The full written version is below
Note: This is the written companion to the video above. Same content, optimized for reading – so you can watch, read, or both, depending on how you learn best.
Now that you know when to use Git and when not to, let’s learn how to use version control to track your work.
Basic local Git workflow
Git tracks your work through commits. You might remember from the previous module that a commit stores a snapshot of the current state of your project.
The basic local Git workflow that leads to a commit follows a few simple steps:
- You change one or more files in your project.
- You decide which one of these changed files you want to store with your next commit, by adding these files to your commit.
- You actually make a commit, which stores the current state of what you have just added to your Git project.
Basic local Git workflow using Git terminology
Git-wise, a file in your Git project can have one of three states. We’ve already seen two of these three possible states:
- Whenever you change or modify a file, the file is modified. Regardless of how the file was modified, these changes have not been stored yet.
- As soon as you are done storing this modified file safely in your Git project, the file is committed. Technically, this means the file returns to the unmodified state.
- In between these two states, we have what is called staged, which is a fancy way of saying you have selected or marked this modified file, maybe along with other modified files, to be stored whenever you make your next commit.
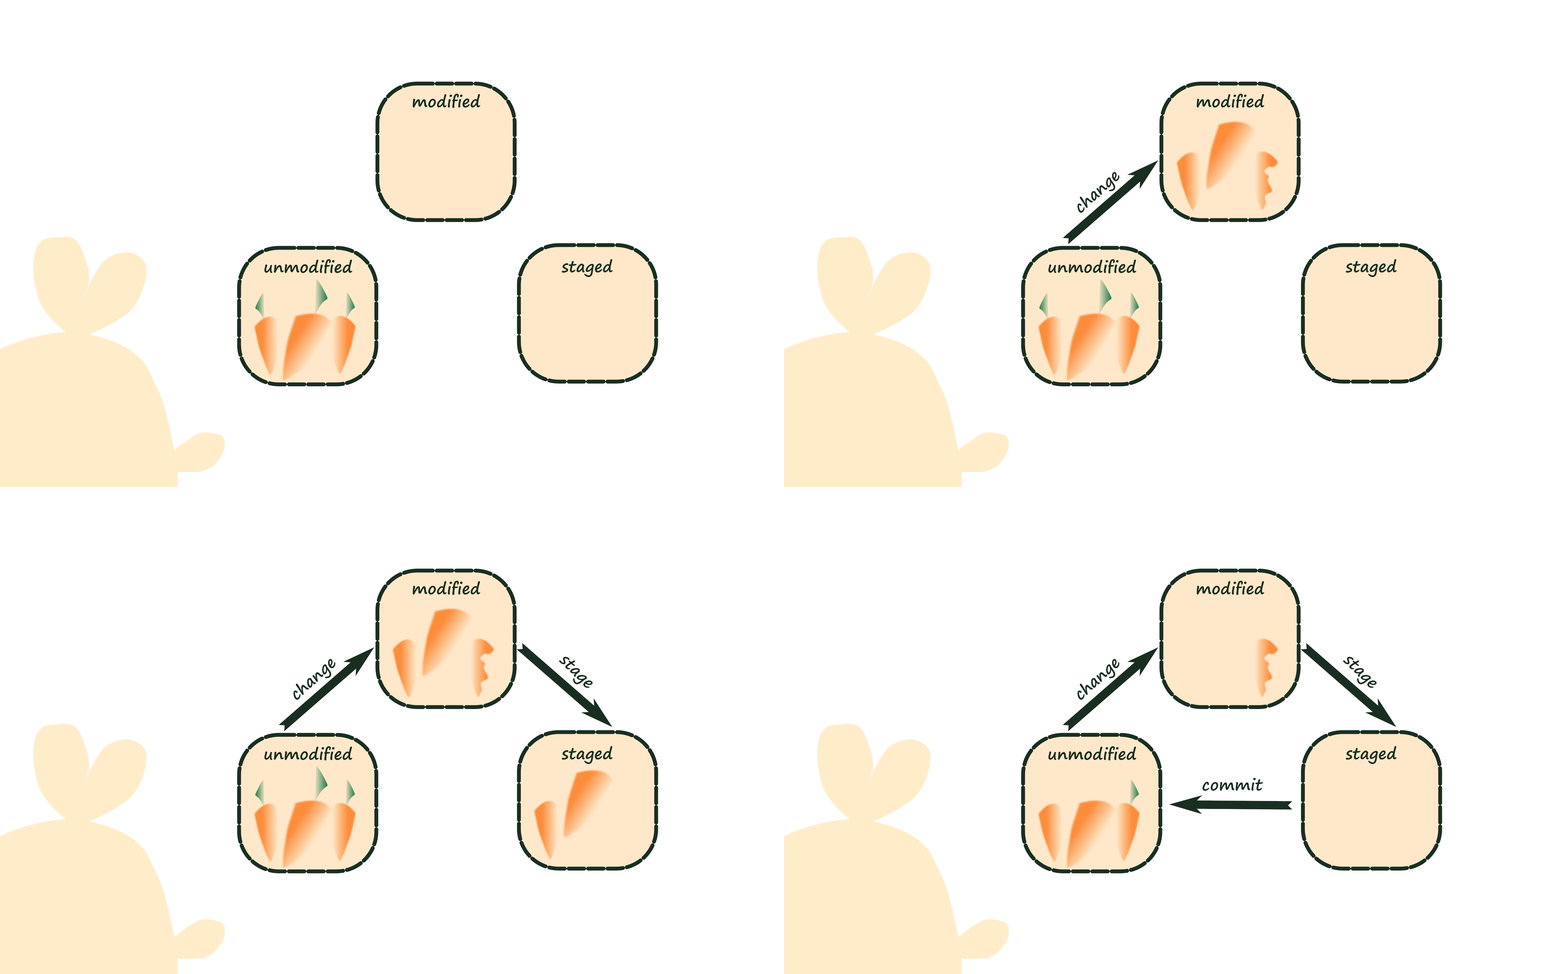
Information on all your files that are in a staged state, i.e., ready to be stored with your next commit, is held in another file that people usually call your staging area, although the technical term for it is index.
Besides the staging area, your Git project also contains the following directories:
- Your working tree or working directory, which is the local directory where you store your files.
- A Git directory, where Git stores whatever it needs to enable version control. This is also called a repository folder.
Typically, you get a Git repository locally in one of the following ways:
- You can either take a local directory on your machine that is not yet under version control and put it under version control by using a Git command that initializes a repository in an existing directory on your local machine.
- Or there is already a Git repository somewhere and you get it on your local machine by using another Git command that does something called cloning.
Either way, once you have a repository, you can:
- Change your version-controlled files.
- Stage one, several, or all of your changed files.
- Commit snapshots of these staged changes each time you reach a state you want to record – ideally in small, meaningful steps, so the history of your commits stays clear and easy to follow.
Summing up, your usual workflow will be something like this:
- You change one or more of your version-controlled files – for Git, these files are seen as modified, because they have changed.
- You select which of the modified files you want to store with your next commit – remember, we call this staging.
- You commit all the staged changes – Git will then see these files as unmodified.
And the process repeats. That’s basically it.
Keeping track of the state of your files
For you to keep track of the state your files are in at any moment, you can use the Git command git status. This shows you the state of your working tree and your staging area, namely:
- All your staged changes, i.e., all the files you have modified and are ready to be stored safely with the next commit, if any.
- All your unstaged changes, i.e., all the files you have modified but will not be committed, again if any.
- Any untracked files, i.e., any files not yet under version control.
git status is an essential command for keeping track of your repository’s state – I can’t recommend it enough. It can easily become your every-other Git command at the terminal. Otherwise, it is very easy to forget to commit something you meant to or accidentally commit something before it was ready.
Nevertheless, you don’t want the output of git status to be polluted by untracked files you do not want to version control. We know Git will not store untracked files until you explicitly tell it to do so, to protect you from version-tracking files you did not mean to. But it will inform you about untracked files in the output of git status. You want to avoid this when you are certain you don’t want to version-control these files, for instance because they are automatically generated files such as logs or compiled files, or because they may store sensitive data such as passwords or tokens. The way to avoid being informed of such untracked files is by listing them in your .gitignore file.
Setting up a .gitignore file has benefits beyond avoiding unnecessary output, because in Git you can add and commit files and file changes not just individually, but in bulk; and you don’t want to accidentally commit files you don’t want in your repository, like files containing passwords or tokens. We won’t go into more detail on .gitignore here, since there are many examples of good .gitignore files online if you want a starting point.
In a nutshell
For everything you don’t ignore: edit, check, stage, check, commit, and repeat – ideally in small, meaningful steps. Next, we’ll see the whole workflow in action for a project not yet under version control.